


 Photo by Markus Spiske from Pexels
As of August 25, 2021, Firebase announced through their blog, that version 9 of FIREBASE SDK is now available. Firebase v9.0 adopts a module first format that is optimized for the elimination of unused code.
The library organization of v9 differs from v8.8.1 by a lot, though the same concept. I could not easily find an updated article that uses the newest version of Firebase to authenticate a React app, so I decided to write this article.
In this article, we are going to use the authentication service from Firebase to authenticate our React app. This article is for developers who are new to Firebase tools.
Firebase is a BaaS(Backend As a Service) that help developers with various services such as analytics, authentication, cloud messaging, real-time database, and many more.
SETTING UP OUR FIREBASE
We need to set up our Firebase project through the Firebase console.

- Go to firebase.google.com to register and get started
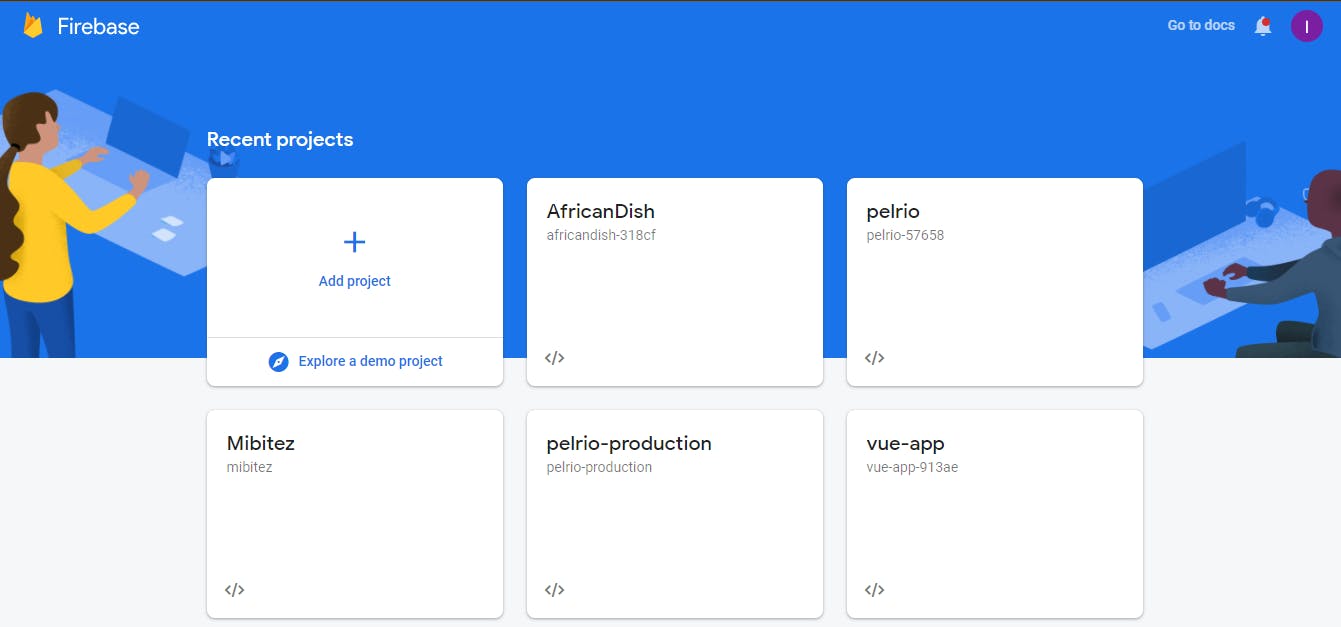
- Add a new project. Give your app any name you want. You can call yours 'firebase-react-auth' for simplicity. You will be redirected to a personalized dashboard after you use your default email to add a project.

- Click on the web icon (</>) to add a web project. Give it a good nickname.
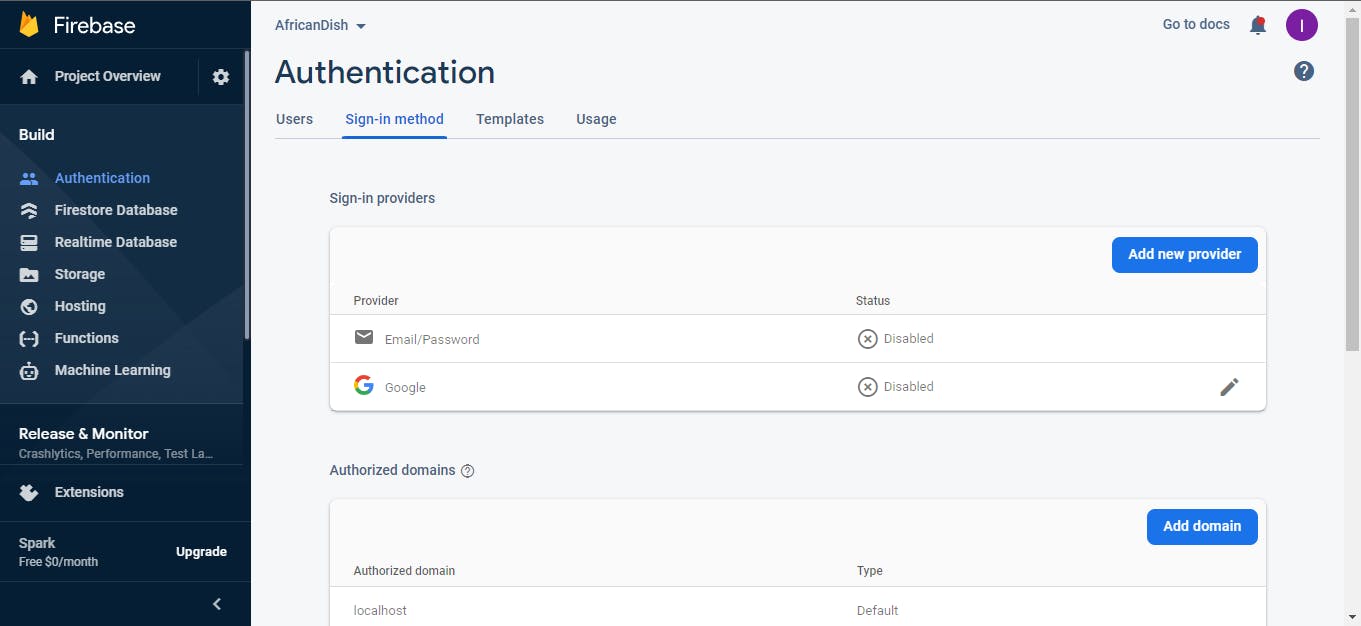
- Set up authentication. Click on the authentication option at the left sidebar. Click on get started and enable any of the available authentication options. For this article, we will only enable "Email/Password" authentication and save it.
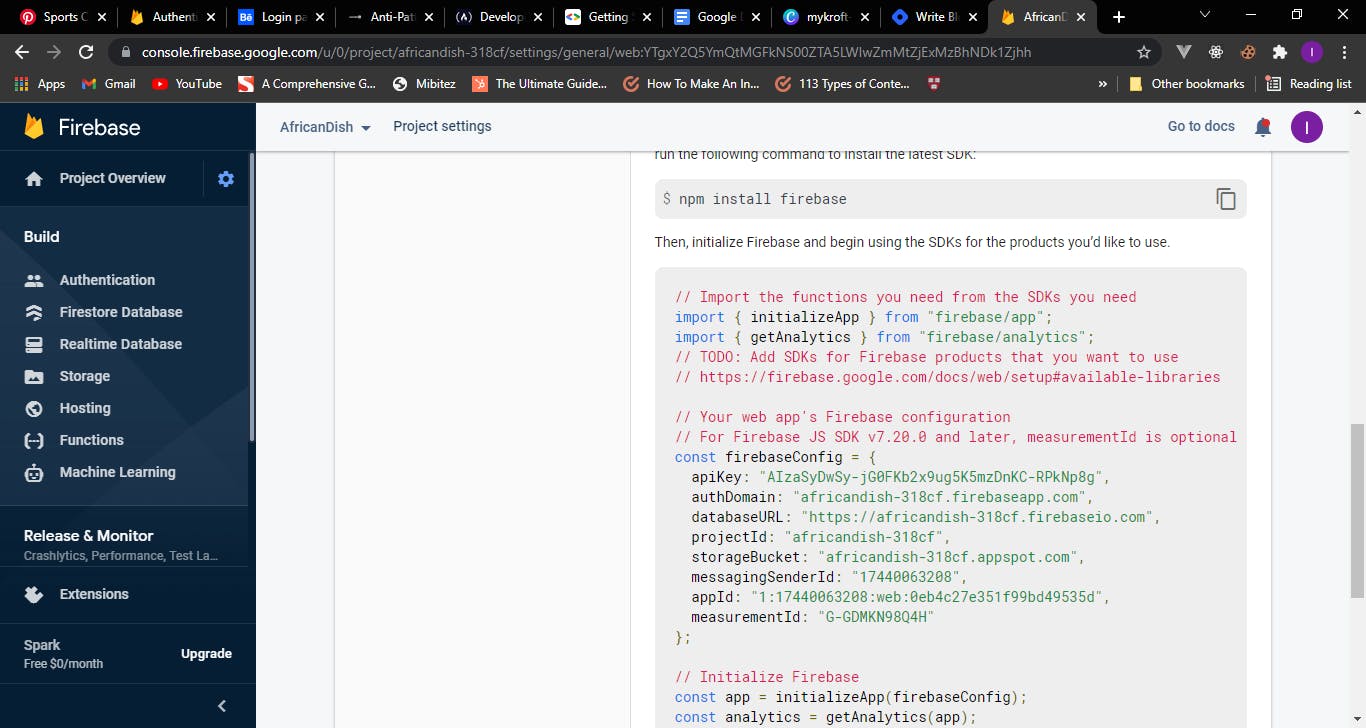
- Click on the Settings icon close to your project overview. Scroll down to copy your unique firebase config file.
SETTING UP REACT APP
We will set up our react app by installing some tools using npm or yarn
- Use npx create-react-app to create your react project
npx create-react-app firebase-auth
NB:- Firebase-auth is the name of our project.
- Install Firebase and react-router-dom.
npm install firebase react-router-dom or
yarn add firebase react-router-dom
We are installing react-router-dom to handle our routing throughout the application. After installation, cd(change directory) into your project and yarn start or npm start.
cd firebase-auth and
yarn start
We will delete some starter files that came with the react template. They include index.css, logo.svg, setupTest.js from the src folder, and also all import statements pointing to these deleted files.
- Create a components folder and add Login.js, Register.js, and Home.js files. Also, create a firebase.js file in your src folder.
Paste the Firebase config file you copied while setting up your Firebase project into your firebse.js file
const firebaseConfig = {
  apiKey: "XXXXXXXXXXXXXXXXXXXXXXXXXXXXX",
  authDomain: "XXXXXXXXXXXXXXXXXXXXXXXXX",
  databaseURL: "XXXXXXXXXXXXXXXXXXX",
  projectId: "africandish-318cf",
  storageBucket: "XXXXXXXXXXXXXXXXXXXX",
  messagingSenderId: "17440063208",
  appId: "1:17440063208:web:0eb4c27e351f99bd49535d",
  measurementId: "G-GDMKN98Q4H"
};
import { initializeApp } from "firebase/app";
Import Firebase into your firebase.js and initialize your Firebase app so that we can use Firebase throughout our React app.
export const app = initializeApp(firebaseConfig);
We will create all related authentication functions in our individual react app components. Let's take a look at all the authentication functions we will be using.
createUserWithEmailAndPassword(auth, email, password)
        .then((userCredential) => {
            // Signed in
            const user = userCredential.user;
            console.log(user)
            history.push('/login')
        })
        .catch((error) => {
            const errorCode = error.code;
            const errorMessage = error.message;
            // ..
        });
signInWithEmailAndPassword(auth, email, password)
        .then((userCredential) => {
            // Signed in
            const user = userCredential.user;
            history.push('/studentDB');
            console.log(user);
            // ...
        })
        .catch((error) => {
            const errorCode = error.code;
            const errorMessage = error.message;
        });
signOut(auth).then(() => {
            // Sign-out successful.
            history.push('/login');
            console.log(auth)
          }).catch((error) => {
            // An error happened.
          });
Read more on Firebase docs about Firebase authentication
INTEGRATING FIREBASE AND REACT APP
- Go to App.js in your src file and import react-router-dom
import {BrowserRouter as Router, Route, Switch} from 'react-router-dom'
Finally, App.js will look like this
import './App.css';
import { BrowserRouter as Router, Route, Switch } from 'react-router-dom';
import Home from './layout/Home';
import Login from './components/Login';
import Register from './components/Register';

function App() {
  return (
    <div className="App">
      <Router>

        <Switch>
          <Route exact path="/">
            <Home/>
          </Route>
          <Route path="/login">
            <Login/>
          </Route>
          <Route path="/signup">
            <Register/>
          </Route>

        </Switch>

      </Router>

    </div>
  );
}

export default App;
To use Firebase with our react app, we will import signInWithEmailAndPassword function from Firebase to our Login component, an onClick event is added to the form button so that whenever the button is clicked, our user will be signed in successfully. We will also import useHistory() from react-router-dom. The useHistory() redirects the user after a successful sign-in to the home component.
So, let create our Login component.
import React, { useState } from 'react';
import {useHistory} from 'react-router-dom';
import './Login.css';
import { getAuth, signInWithEmailAndPassword } from "firebase/auth";

const Login = () => {
    const [email, setEmail]= useState("");
    const [password, setPassword]= useState("");
    const history = useHistory();

    const onLogin= (e) => {
        e.preventDefault();
        const auth = getAuth();

        signInWithEmailAndPassword(auth, email, password)
        .then((userCredential) => {
            // Signed in
            const user = userCredential.user;
            history.push('/');
            console.log(user);
            // ...
        })
        .catch((error) => {
            const errorCode = error.code;
            const errorMessage = error.message;
        });
    }

    return (
        <>
            <section className="register">
                <form action="">

                    <div>
                        <input
                            type="email"
                            placeholder="E-mail"
                            value={email}
                            onChange={(e) => setEmail(e.target.value)}
                            required
                        />
                    </div>

                    <div>
                        <input
                            type="password"
                            placeholder="Password"
                            value={password}
                            onChange={(e) => setPassword(e.target.value)}
                            required
                        />
                    </div>

                    <div>
                        <button
                            onClick={onLogin}
                        >
                            Login
                        </button>
                    </div>
                </form>
            </section>
        </>
    )
}

export default Login
Our Login component will have the following CSS
.login {
    display: flex;
    justify-content: space-between;
}

.login-img img {
    height: 100vh;
    border-radius: 0% 100% 16% 70% / 11% 21% 74% 0%;
}

.login-form {
    display: block;
    margin: auto;
}

.login-form form {
    margin-right: 4rem;
}

.login-form form div input {
    width: 160%;
    /* max-width: 400px; */
    border: none;
    border-bottom: 2px solid rgb(110, 12, 12);
    background-color: #efefef;
    outline: none;
    padding: 3px 5px 5px 4px;
}

.login-form form div input:focus {
    color: rgb(110, 12, 12);
}

.login-form form div {
    padding-top: 1.5rem;
}

.login-form form div button {
    width: 160%;
    padding: 10px;
    font-size: 15px;
    color: var(--secondary-color);
    background: crimson;
    outline: none;
    border: none;
}
Here is how our Login Component will finally look like

- Let create our Sign-up component.
import React, {useState} from 'react';
import './Register.css';
import {Link, useHistory} from 'react-router-dom';
import { getAuth, createUserWithEmailAndPassword } from "firebase/auth";
import {app} from '../firebase';
import signUpImg from '../assets/yourspace-min.png';


const Register = () => {
    const [name, setName]= useState("");
    const [email, setEmail]= useState("");
    const [password, setPassword]= useState("");
    const history = useHistory();


    const onSignUp = (e) => {
        e.preventDefault();

        const auth = getAuth();
        createUserWithEmailAndPassword(auth, email, password)
        .then((userCredential) => {
            // Signed in
            const user = userCredential.user;
            console.log(user)
            history.push('/login')
        })
        .catch((error) => {
            const errorCode = error.code;
            const errorMessage = error.message;
            // ..
        });


    }

    return (
        <>
            <section className="register">
                <div className="register-img">
                    <img src={signUpImg} alt="sign up image"/>
                </div>

                <div className="register-form">
                    <form action="">
                        <div>
                            <input
                                type="text"
                                placeholder="Full Name"
                                value={name}
                                onChange={(e) => setName(e.target.value)}
                                required
                            />
                        </div>

                        <div>
                            <input
                                type="email"
                                placeholder="E-mail"
                                value={email}
                                onChange={(e) => setEmail(e.target.value)}
                                required
                            />
                        </div>

                        <div>
                            <input
                                type="password"
                                placeholder="Password"
                                value={password}
                                onChange={(e) => setPassword(e.target.value)}
                                required
                            />
                        </div>

                        <div>
                            <button
                                onClick={onSignUp}
                            >
                                Sign Up
                            </button>

                        </div>
                    </form>
                </div>
            </section>
        </>
    )
}

export default Register
Our Sign-up component(Register.js) will have an imported createUserWithEmailAndPassword function from Firebase. Just like our Login.js, In our Register.js, the form button will have an Onclick event. Whenever the button is clicked, the onSignUp function is called and a new account is created.
Our Sign Up component will have the following CSS. Both components will use a useHistory() function from react-router-dom to redirect users if sign-in or sign-up is successful.
.register {
    display: flex;
    justify-content: space-between;
}

.register-img img {
    height: 100vh;
    border-radius: 0% 100% 16% 70% / 11% 21% 74% 0%;
}

.register-form {
    display: block;
    margin: auto;
}

.register-form form {
    margin-right: 4rem;
}

.register-form form div input {
    width: 160%;
    /* max-width: 400px; */
    border: none;
    border-bottom: 2px solid rgb(110, 12, 12);
    background-color: #efefef;
    outline: none;
    padding: 3px 5px 5px 4px;
}

.register-form form div input:focus {
    color: rgb(110, 12, 12);
}

.register-form form div {
    padding-top: 1.5rem;
}

.register-form form div button {
    width: 160%;
    padding: 10px;
    font-size: 15px;
    color: var(--secondary-color);
    background: crimson;
    outline: none;
    border: none;
}
Here is how your Login Component will look like after adding adding the CSS codes

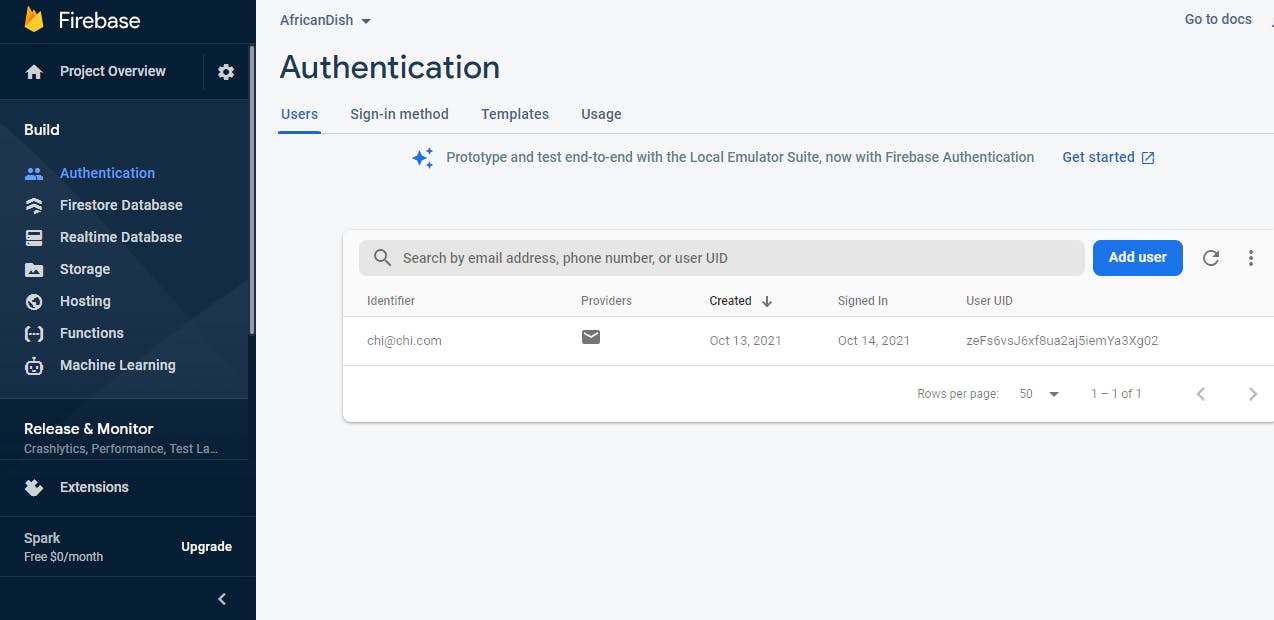
Each successful sign in or sign up from your user will get reflected on your firebase dashboard
- Let's create our home component. Our Home component will be a simple page that has a button to handle our sign out function
import React from 'react';
import { getAuth, signOut } from "firebase/auth";
import { useHistory } from 'react-router-dom';

const Dashboard = () => {
    const history = useHistory();
    const onSignOut = (e) => {
        e.preventDefault();

        const auth = getAuth();

        signOut(auth).then(() => {
            // Sign-out successful.
            history.push('/login');
            console.log(auth)
          }).catch((error) => {
            // An error happened.
          });
    }

    return (
        <>
            <form action="">
                    <div>
                        <h1>This is the home component</h1>
                        <button
                            onClick={onSignOut}
                        >
                            Log Out
                        </button>
                    </div>
                </form>
        </>
    )
}

export default Dashboard
Our Home component will only have an h1 tag and a button that has an onClick event, therefore without CSS. You will only be redirected to your home component if authentication is successful. If you do, congratulations, you have successfully authenticated your React app.
Here is how your Home Component will look like:

Thank you. I hope you enjoyed it.
WHAT'S NEXT?
You have a simple app that authenticates. I hope you go ahead to modify this app, make it better and add a lot of features.